

Results and Export
Review results
Section titled “Review results”Open the results list for your event:
- Go to the Events list.
- Find your event and open the row dropdown menu (small arrow on the left).
- Click Results.

The results list shows every challenge response from every team:
| Column | What it tells you |
|---|---|
| Team | Which team submitted this response |
| Date | When they submitted it |
| Type of Challenge | What kind of challenge it was (Questions, Photo, Puzzle, etc.) |
| Correct Answer | The expected answer (for quiz-type challenges) |
| Answer | What the team actually answered |
| Picture | Thumbnail of their photo submission (click to see full size) |
| Name | The challenge name |
| Points | Points awarded |
| Extra points | Bonus points, if any |
Use the search box to filter by team name, challenge name, or any other column. Change the page size (10, 25, 50, 100 results per page) to see more at once.
Score remaining photos
Section titled “Score remaining photos”If your event included photo, video, or free-text challenges, some results will need manual scoring. Unlike quiz questions (which are graded automatically), these creative responses require your judgement.
Two types of submissions need your attention:
- Photo/video submissions — appear in the results list with 0 points until you review them. Click the points field inline to assign a score, or switch to the Photos without score view to work through all unscored submissions in one batch.

- Free-text answers — open-ended responses where teams typed their own answer. Use the dedicated Score free text questions page to read each response side-by-side with the original question and assign points.

For the detailed step-by-step scoring process, see How to score photo challenges.
Generate the report
Section titled “Generate the report”The report is what you give your client — a complete summary of the event. MooveTeam CMS generates it automatically.
- From the events list row dropdown, click Report (or from the results list, click Report).
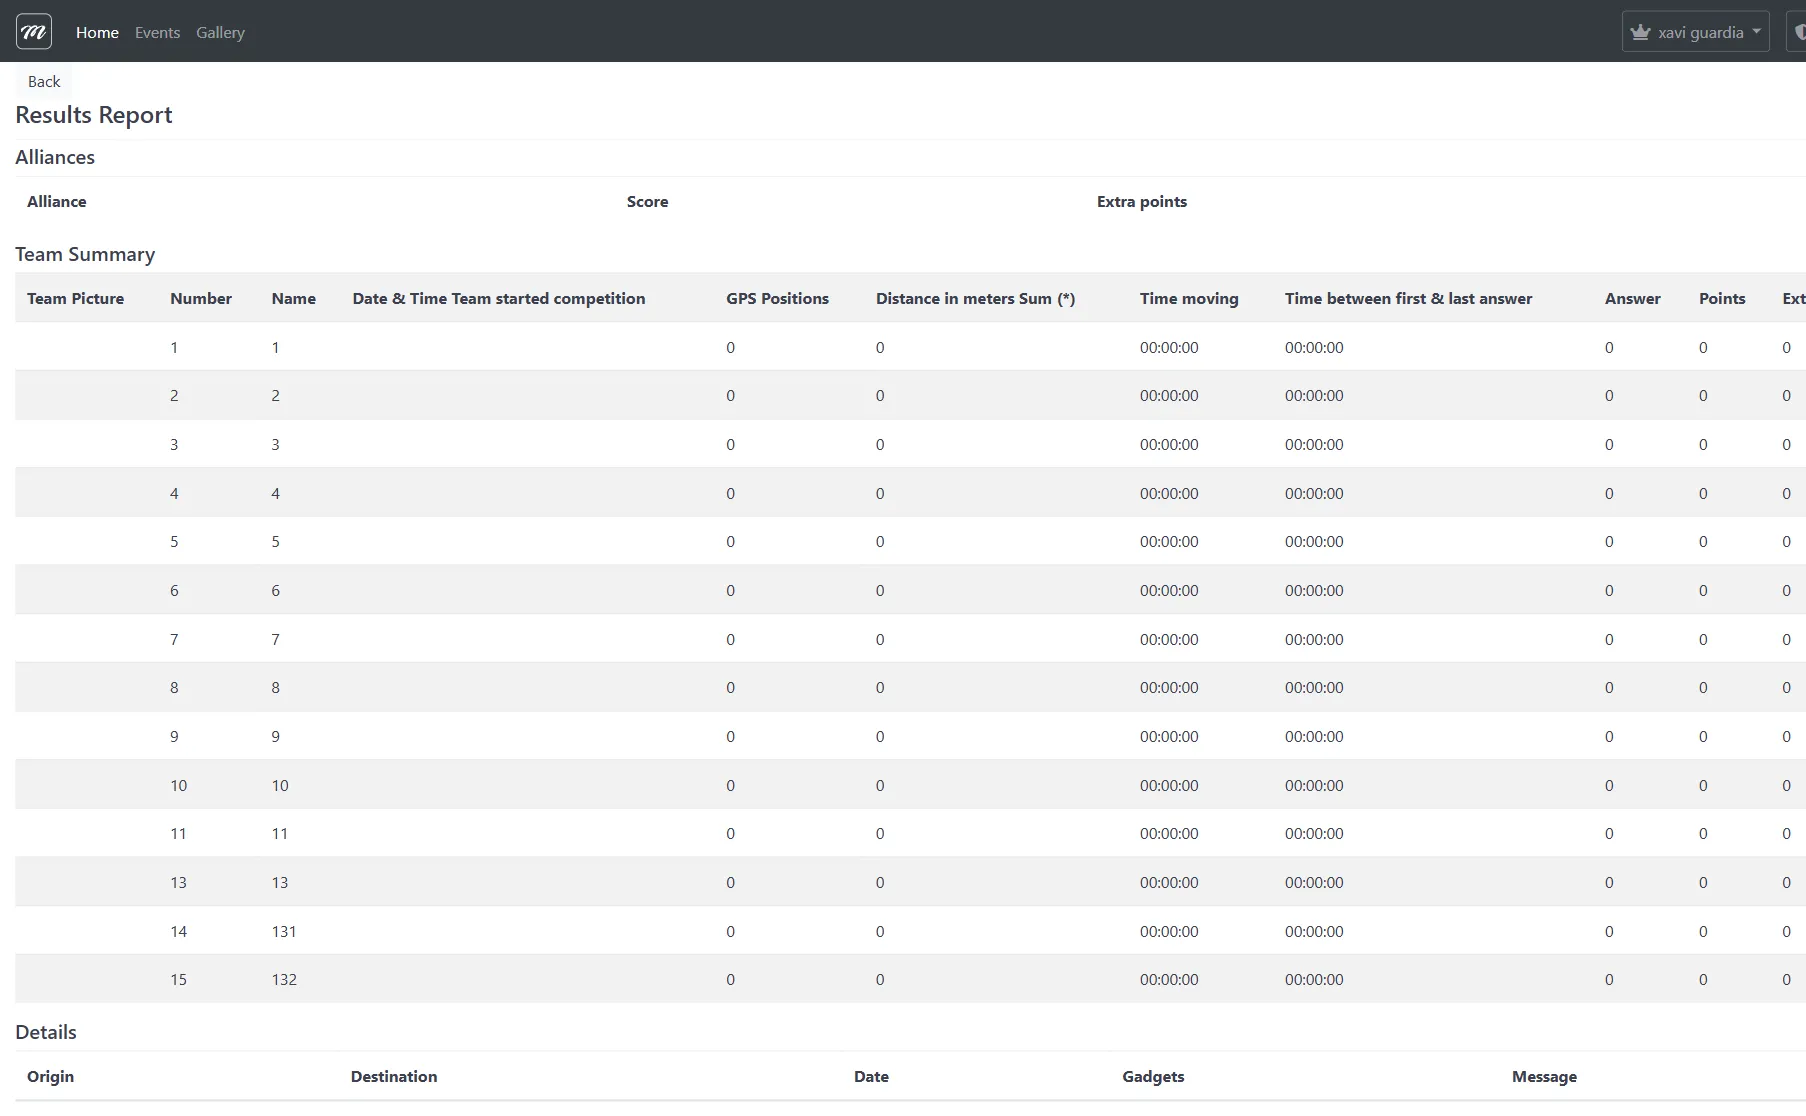
The report includes:
Alliance summary (if alliances were used)
Section titled “Alliance summary (if alliances were used)”- Total score per alliance (averaged, so bigger alliances do not automatically win)
Team summary
Section titled “Team summary”For each team:
- Team photo
- When they started playing
- GPS positions recorded
- Total distance walked (in meters)
- Time spent moving
- Number of challenges answered
- Total points and bonus points
Score by segments (if segments were used)
Section titled “Score by segments (if segments were used)”If the event used segments, the report breaks down each team’s score by segment — so you can see how each team performed in each phase of the game.
Per-team detail
Section titled “Per-team detail”Below the summary, each team has its own section with:
- Every challenge response (question, answer, points, response time)
- All photos and videos submitted
- Gadget inventory (which gadgets they had and used)
Messages log
Section titled “Messages log”All messages sent during the event — between teams, from teams to you, and from you to teams.
The report is designed for printing. Each team section starts on a new page.
Distances report: If you only need movement data (distance walked, time moving), use Distances report from the row dropdown — it shows just the GPS metrics without all the challenge detail.
Export to Excel
Section titled “Export to Excel”For clients who want raw data in a spreadsheet:
- From the events list row dropdown, click Export results.
- A ZIP file downloads to your computer.
- Open the ZIP — inside is an Excel workbook with:
- A Results sheet listing every challenge response (team, challenge, answer, points, time)
- A separate sheet for each team with their submitted photos embedded
Export photos
Section titled “Export photos”For events with many photo submissions, you can export all photos at once:
- From the events list row dropdown, access the photo export page.
- Enter the email addresses where download links should be sent (your company’s email addresses are pre-filled).
- Click Export.

This does not download instantly — photo export runs as a background job because events can have hundreds or thousands of photos. When it finishes:
- The listed email addresses receive a message with download links.
- The download links are valid for 4 days. Save the files before they expire.
- You can check the job status on the same page (Pending → Processing → Done).
Show results on a screen
Section titled “Show results on a screen”For live events or award ceremonies, MooveTeam CMS can display results on a projector or TV:
| Display | What it shows | How to access |
|---|---|---|
| Control Panel | Live leaderboard customizable with HTML templates | Share the public control panel URL |
| Photo Slideshow | Cycling display of submitted photos | Events list → row dropdown → Photo slideshow |
| Public Results | Full results table (no login required) | Share the public results URL |
For field-level detail on public displays, see the Public Displays Reference.
Clean up
Section titled “Clean up”After you have exported everything you need:
- Keep the event if you plan to reuse it. You can duplicate it for future clients.
- Clear results if you want to keep the event structure (teams, challenges, routes) but wipe all results data. This is useful when rerunning the same event for a different client.
- Delete the event if you are done with it permanently. You must type the event name to confirm — deletion cannot be undone.
Post-event checklist
Section titled “Post-event checklist”Before closing the project:
- All photo challenges scored
- All free-text responses scored
- Report generated and saved or printed
- Excel export downloaded
- Photos exported (if needed) and download links saved before 4-day expiration
- Client received their deliverables (report, photos, scores)
- Event duplicated as a template (if you want to reuse it)
What you have learned
Section titled “What you have learned”You have created an event from scratch, run it, and extracted the results. You now know the full lifecycle:
Design → Test → Run → Review → Export → Deliver
From here:
- Need to do something specific? Check the How-To Guides.
- Something not working? Open Troubleshooting.
- Looking up a specific field or button? See the Interface Reference.
You have reached the end of Part 2. The tutorial is complete. Everything from here is reference material — how-to guides for specific tasks, troubleshooting for common problems, and a glossary of terms.
Next: How-To Recipes — quick instructions for specific tasks you will encounter regularly.